
Are you a business owner and a WordPress enthusiast?
If you’re running a service-based business—think salons, car rentals, clinics, or even yoga studios—you know how tricky it can be to manage bookings. Phone calls, emails, and missed appointments can turn your day into chaos. But what if you could take care of all that with a single WordPress plugin? Enter WpBookingly, one of the best service booking WordPress plugins.
In this guide, we’ll walk you through everything you need to know about WpBookingly, from setup to pro tips, in a way that’s easy to follow and optimized for your success. Let’s dive in!
What is WpBookingly?
WpBookingly is a powerful WordPress plugin designed to simplify appointment scheduling and service bookings. Whether you’re a hairstylist in New York, a car repair shop in London, or a tutor offering online classes globally, WpBookingly integrates seamlessly with your WordPress site to create a smooth booking experience. It’s mobile-friendly, WooCommerce-powered, and packed with features to keep your business organized and your customers happy. Plus, it comes in Free and Pro versions to suit businesses of all sizes.
Why choose WpBookingly?
It’s lightweight, customizable, and supports a wide range of industries—salons, healthcare, fitness, education, and more. With features like calendar management, payment integration, and staff scheduling, it’s a game-changer for service-based businesses.
Why Use WpBookingly for Your Business?
Before we get into the nitty-gritty, let’s answer a question you might have:
Why should I use WpBookingly?
Here’s why it’s a perfect fit:
- User-Friendly: A clean, intuitive booking form makes it easy for customers to schedule appointments.
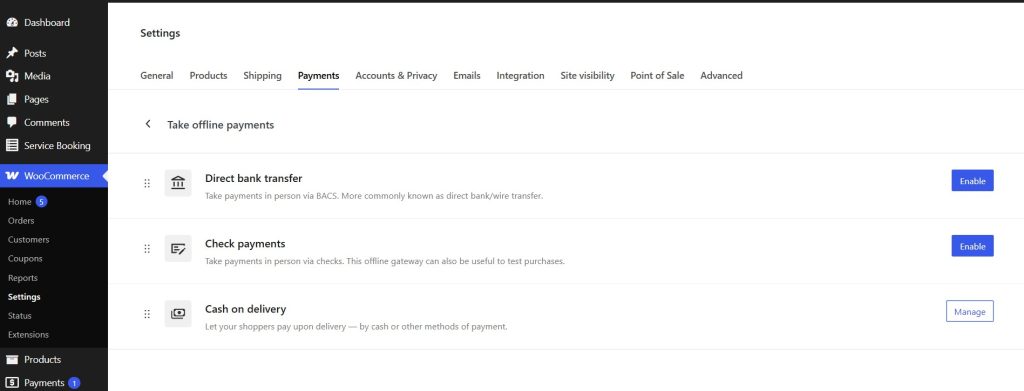
- WooCommerce Integration: Accept payments via PayPal, Stripe, or other gateways.
- Mobile-First Design: Works flawlessly on phones, tablets, and desktops.
- Flexible Features: From staff management to recurring bookings, it scales with your needs.
- Global and Local Appeal: Supports multilingual setups and local time zones, ideal for businesses serving diverse or local audiences.
Whether you’re optimizing for SEO (to rank higher on Google) or AEO (to appear in AI-driven answer engines like Google’s featured snippets), WpBookingly’s structured setup helps your booking pages get noticed.
Step-by-Step Guide to Setting Up WpBookingly
Ready to get started? Here’s how to set up WpBookingly on your WordPress site. Follow these steps, and you’ll have a professional booking system up and running in no time.
Step 1: Install and Activate WpBookingly
- Log in to WordPress: Head to your WordPress dashboard.
- Go to Plugins: Click “Plugins” > “Add New.”
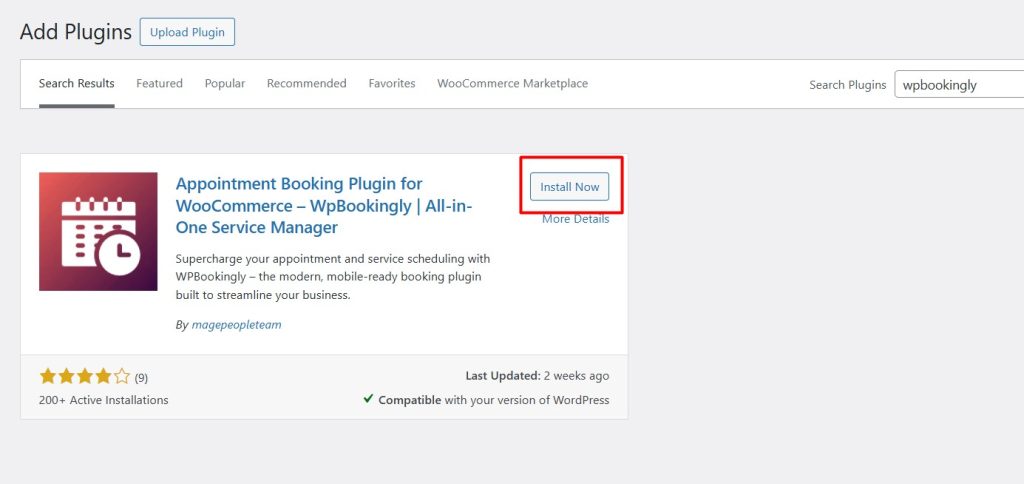
- Search for WpBookingly: Type “WpBookingly” in the search bar.
- Install and Activate: Click “Install Now,” then “Activate.” Note: You’ll need the WooCommerce plugin installed, as WpBookingly relies on it for payments. If prompted, install WooCommerce too.
- Configure Settings: After activation, follow the setup wizard to choose preferences like currency, time zone, and manager labels. Click “Finish & Save” to complete.
Pro Tip: Ensure your WordPress site is updated to avoid compatibility issues. WpBookingly is regularly updated to work with the latest WordPress versions.
Step 2: Add a New Service
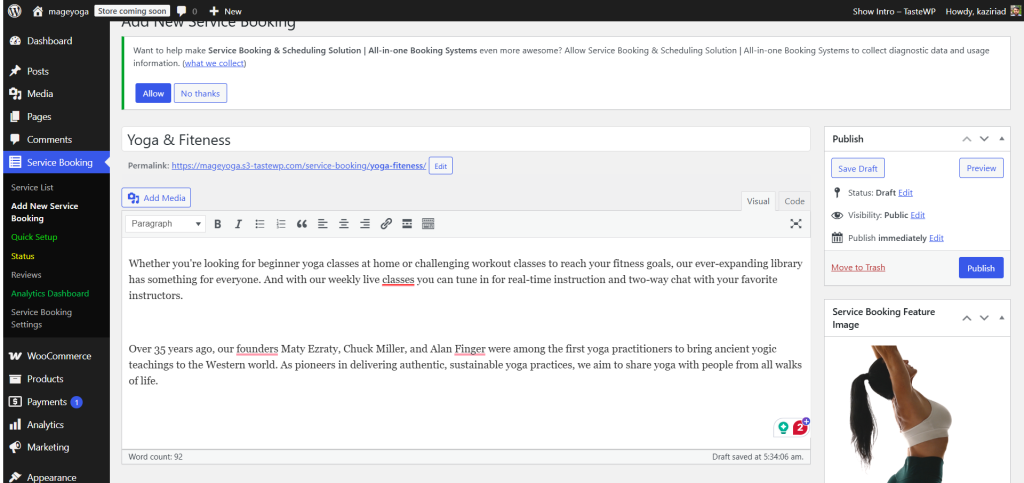
- Navigate to Service Booking: In your dashboard, find the “Service Booking” menu.
- Create a New Service: Click “Add New Service Booking.”
- Set Service Details:
- Title and Description: Add a catchy title (e.g., “Luxury Spa Massage”) and a description to entice customers.
- Pricing: Set prices for different service types (e.g., $50 for a 30-minute session, $80 for an hour).
- Images: Upload high-quality images to make your service visually appealing.
- Date & Time: Define schedules, off days (e.g., holidays), time slot lengths, and capacity (e.g., 5 clients per slot).
- Publish: Click “Publish” to make the service live.
NLP Tip: Use clear, natural language in your service titles and descriptions (e.g., “Relaxing Massage in Miami” or “Car Wash in Sydney”) to align with how users search, boosting SEO and AEO.
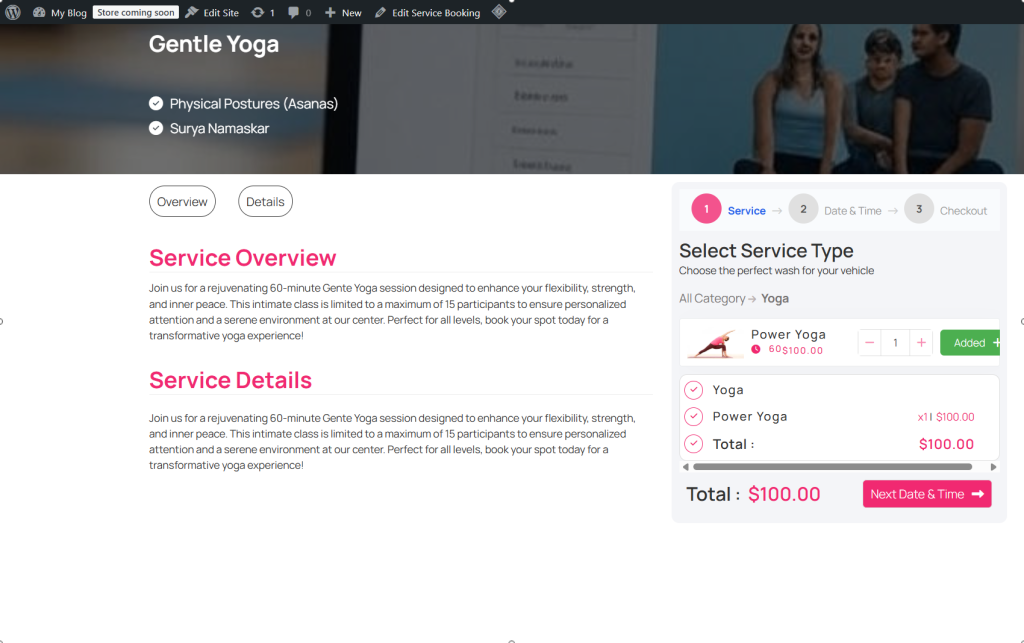
Step 3: Embed the Booking Form
- Use Shortcodes: WpBookingly provides shortcodes (e.g., [[bookingplus post_id=’123′]]) to add booking forms to any page or post.
- Create a Booking Page: Go to “Pages” > “Add New,” add the shortcode, and publish the page.
- Customize Appearance: Adjust the form’s style (colors, fonts) in the Pro version to match your brand.
GEO & LEP Insight: Include location-specific keywords in your page titles and shortcode placements (e.g., “Book a Haircut in Chicago”) to optimize for Global Entity Optimization (global reach) and Local Entity Processing (local search relevance).
Step 4: Test Your Booking System
Before going live, test the system:
- Make a few test bookings to ensure the form is user-friendly.
- Check that confirmation emails are sent correctly.
- Verify payment processing (if enabled) via WooCommerce gateways.
Step 5: Go Live!
Once tested, promote your booking page via your website, social media, or email campaigns. WpBookingly’s SEO-friendly structure ensures your booking pages are crawlable, helping you rank for terms like “book a massage in [[your city]].”
Free vs. Pro: Which WpBookingly Version Should You Choose?
WpBookingly offers a Free version for basic needs and a Pro version for advanced functionality. Here’s a quick comparison to help you decide:
Free Version
- Basic Booking System: Simple form for scheduling services.
- WooCommerce Payments: Accept payments via PayPal, Stripe, etc.
- Shortcode Support: Embed forms anywhere on your site.
- Service Management: Add services, prices, and time slots.
- Multilingual Support: Translation-ready for global audiences.
- Best For: Small businesses or solo entrepreneurs (e.g., a single tutor or photographer).
Pro Version
- All Free Features: Everything in the Free version, plus:
- Staff Management: Assign staff to services, manage individual schedules, and let clients choose their preferred provider.
- Recurring Bookings: Support for weekly/monthly appointments (e.g., yoga classes).
- Google Calendar Sync: Avoid double bookings with real-time sync.
- Advanced Notifications: Customizable email, SMS, or WhatsApp reminders.
- PDF Invoices: Send branded invoices or tickets.
- Group Bookings: Allow multiple bookings per time slot (e.g., for workshops).
- Analytics: Track bookings and revenue.
- Pricing: Starts at $29/year (Standard) or $69/lifetime (Deluxe). Check https://wpbookingly.com for details.
- Best For: Businesses with multiple staff or complex needs (e.g., salons, clinics).
Pro Tips for Maximizing WpBookingly
- Optimize for Local Search (LEP): Add city-specific pages (e.g., “Car Rental Booking in Dubai”) to attract local customers. Use schema markup for services to enhance local visibility.
- Leverage NLP: Write service descriptions in a conversational tone, mirroring how customers search (e.g., “How to book a spa appointment near me”).
- Boost AIO & AEO: Structure your booking pages with clear headings (H1, H2), bullet points, and FAQs to make them AI-friendly for featured snippets.
- Global Reach (GEO): Offer multilingual booking forms and time zone support to cater to international clients.
- Reduce No-Shows: Use Pro version’s automated reminders (email, SMS) to keep clients on track.
- Track Performance: Use Pro analytics to identify popular services and optimize pricing or schedules.
Who Can Benefit from WpBookingly?
WpBookingly is versatile enough for various industries:
- Beauty & Wellness: Salons, spas, massage therapists.
- Healthcare: Doctors, dentists, clinics.
- Fitness: Gyms, yoga studios, personal trainers.
- Education: Tutors, music schools, online courses.
- Automotive: Car rentals, repair shops, car washes.
- Hospitality: Restaurants, event planners.
- Professional Services: Consultants, photographers, lawyers.
Example: A Miami-based salon can use WpBookingly to let clients book haircuts, manage stylist schedules, and accept payments via Stripe, all while syncing with Google Calendar to avoid conflicts.
You can find all the use cases demo on WpBookingly.com.
Well, if you want to create a salon booking website, check out how to make a salon booking website.
FAQs About WpBookingly
Do I need WooCommerce for WpBookingly?
Yes, WpBookingly requires WooCommerce for payment processing and core functionality. Install it during setup if you don’t already have it.
Can I use WpBookingly for free?
Absolutely! The Free version is great for basic booking needs, but the Pro version unlocks advanced features like staff management and recurring bookings.
Is WpBookingly SEO-friendly?
Yes, its clean code and structured data make it easy for search engines to crawl and index your booking pages, boosting visibility.
How do I get support?
For Free version users, check the WordPress.org forum. Pro users get priority support via https://wpbookingly.com.
Conclusion
WpBookingly is your ticket to a stress-free booking system on WordPress. Whether you’re a small business or a growing enterprise, its Free and Pro versions offer the tools you need to manage appointments, delight customers, and grow your business. From easy setup to advanced features like staff management and Google Calendar sync, WpBookingly has you covered. Plus, its SEO, AIO, and AEO-friendly design ensures your booking pages reach the right audience, locally and globally.
Ready to transform your booking process? Install WpBookingly today and watch your business thrive. Check out the Pro version at https://wpbookingly.com for even more power!